I have another AMAZING guest post for you today! Let me tell you that this post is totally out there and amazing! I love what Janice did and wish that I had learned to crochet when I was younger. It might just be something I put on my Bucket List! Thanks Janice!
Hi there! I’m Janice Daquila-Pardo of The Constant Scrapper, and I am thrilled to be writing my first guest post for Live. Teach. Create. Thanks so much, Jennifer.
Although I have been scrapping for several years, I only started to blog about it within the past year. It really does complete the cycle for me: conceive of the story/layout, create the layout and then share it with like-minded crafters. Sharing my work (and what I learned while doing it) was the piece that was missing for me, and so my blog makes me quite happy. I hope you’ll visit me there and also maybe follow me on Twitter (I’m @constantscrappr).
Crocheting on the page
Once a week after school my brother and I walked to the nearby public library for their kids’ program. We browsed for new books to sign out, got a little help researching a report we were writing and occasionally learned a new skill from a willing adult. This is how I learned to crochet in third grade.
Knowing how to crochet has given me many hours of pleasure since then. But as many other paper crafters will admit, once I started scrapbooking I didn’t give my other hobbies much attention. When I recently came across my little case full of crochet hooks I began calculating how long it had been since I last used them and felt a little twinge. So I decided it was high time I break out the yarn and hooks and add a little crochet magic to my next layout.
Here’s what I did:
1. Select a sketch
I always use sketches to start my layouts, so the first step for me was to find one that would allow me to highlight a crocheted edge. I decided on this sketch from Jana Eubank’s site because I envisioned the large circle element would be perfect for my crochet plans.
2. Choose your supplies
I chose some patterned papers and cardstock that I wanted to work with, but I immediately put them aside because I realized that I should make a template so as not to ruin the only piece I had of each. (I’m very glad I did, as it took a little trial and error to work out the best way.)
3. Do a practice run
I determined from my sketch that I wanted the circle to be 8.5 inches. So I cut an 8-inch circle from cardstock, knowing that the crocheted edge would account for the final 0.5 inch. I was picturing doing a ton of measuring and marking on the circle to create evenly spaced punch holes when I remembered that I had purchased a circle plastic canvas sheet a while back to use as a template for stitching on my layouts. Perfect! I marked the center of the circle as a placeholder and then marked every other hole of the second row from the edge of my cardstock. Then I put my Crop-A-Dile to work and punched each mark with its smaller hole punch.
To save myself the potential of a lot of punching for no good reason, I decided to do some test crochet stitches to make sure the spacing would work well. If I was going to have to start over on the marking/punching part of the project I didn’t want to have to find out after finishing a whole (unusable) template! My test proved that the spacing would work, so I continued punching around the rest of the circle.
4. Punch around the patterned paper
At this point I was ready to punch the paper I would use on the layout. So I adhered the cardstock template to the back of the patterned paper and punched around the whole thing. I might make two suggestions here:
- Only put adhesive in the center part of the circle. If you put sticky stuff around the edge you could get your hole punch gunked up, and when you add the crochet you will take care of adhering the edges together.
- Perhaps take a little break partway through the punching part of the project, as I did. It’s a lot of time to spend squeezing the Crop-A-Dile, and my hand got pretty fatigued! 🙂
5. Pull out your yarn and crochet hook
Because I didn’t want to punch larger holes in my project so that a yarn crochet hook would fit through, I chose to use crochet thread and a 2.25 mm hook. It was also a lovely coincidence that I had just the right shade of thread in my stash to match the colors in my patterned paper.
6. Stitch a row of single crochet
Before I start into the crocheting part of the tutorial, I should point out that there is an abundance of resources online for learning these stitches if you are not yet a crocheter. I am just going to talk about the crochet part rather than teach it.
Set up your hook with the yarn or thread.
- Insert the hook into a hole (preferably one that will be behind another element on your page just in case where the rows end isn’t seamless. Yarn over and pull your yarn through the hole to end with a slip stitch.
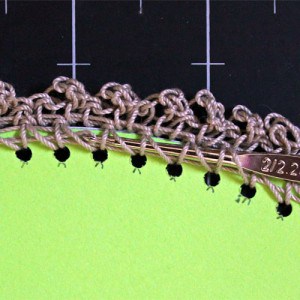
- Do a single crochet stitch in every hole around the shape. This is your base.
I really think the project looks beautiful with just this simple row of single crochet stitches, and I can see doing this for another layout in the future. But for this project I had in mind a little more of an edge, so I continued.
7. Do the edging row
Here’s where you have to decide, from out of all the edging stitches out there, which one is right for your layout. I chose the picot stitch because I am using this on a heritage layout and it just seemed to fit.
So here it is finished. I really love the way it came together!
But there’s one more thing to do before using this on a layout. Turn it over and use your crochet hook to thread the loose ends through the stitches. This secures them and keeps them from showing through. Of course, you could also adhere them with acid-free tape.
Because I put a good bit of work into this part of my layout, I decided to simplify my use of the original sketch so that as much as possible of the circle would show. This means that I used only one photo and didn’t use the three-point embellishments. I want the focus to be on my Nana’s photo and that crocheted element.
Thanks for sticking with me to the end of this tutorial. 🙂 I truly hope that I have inspired some of you to try crocheting on the edge of your paper. I believe the effect is stunning and worth the effort, and I hope you do too!
I really have enjoyed preparing this tutorial for you, and I hope you will join me over at The Constant Scrapper and let me know if you made anything with it. Thanks for sharing your blog with me for the day, Jennifer! Happy crafting, everyone.
Teach Me About Math Workshop!
Looking for all the latest about using Math Workshop in the Middle Grades? Join today and grab the FREE Editable Math Workshop Sheets and all of the great emails to come your way!
Success! Now check your email to confirm your subscription.


